Plywood garboard removal
Moderators: a j r, TDockside, Miles, Moderators
-
Classicboats4me
- Posts: 52
- Joined: Fri Dec 05, 2008 1:49 pm
- Location: Oshkosh,Wisconsin
- Contact:
Garboard Removal.
Very cool that you are taking this boat apart in this way. I am interested in the repair of the ribs. When splicing will have to be done to the ends at the keelson etc. I have found that the ribs at the turn of the bilge have hidden rot on the backside. If a rib at this point is a complete failure. Then that repair will be interesting to see. Most rib repairs are with a steamed rib that is forced in from the top. Pushing down into the boat with the lapstrakes giving it its shape.Your boat may have to reassembled with a missing rib. Or maybe a form/ jig/mold like it was built at the factory. Go for it. And keep up the good work.
Ron Pistohl
1965 Thompson Sea Mate
1975 Yar-Craft Yankee
Oshkosh,Wisconsin.
http://www.flickr.com/photos/waddlep/show/
1965 Thompson Sea Mate
1975 Yar-Craft Yankee
Oshkosh,Wisconsin.
http://www.flickr.com/photos/waddlep/show/
-
62cruiserinc
- Posts: 21
- Joined: Mon Apr 19, 2010 7:44 pm
Last night we took off the other garboard and one lapstrake on each side.
Here is the picture so far:
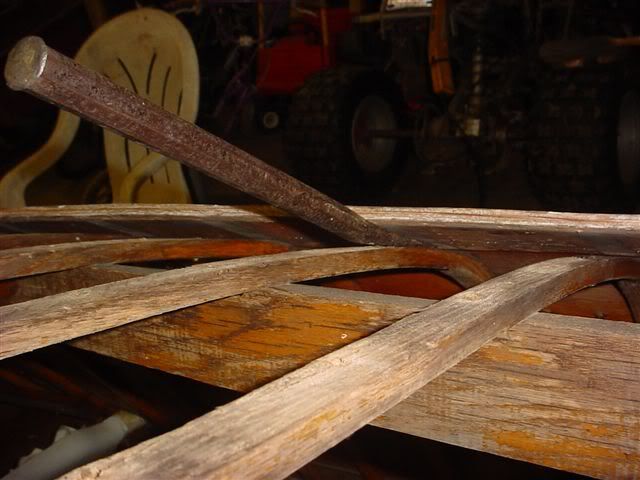
I had previously mentioned a few hidden nails through the boards that were covered up by the lap of the next lapstrake. They were probably used to hold the lapstrake in place while the screw holes were drilled. The nails are brass and are easily sliced flush with the rib. Here is how I sliced them off with a long chisel:
Finally, here's a major problem area: the end of the stem where it joins the inner keel. You can see from the picture below that it has split and pulled apart:
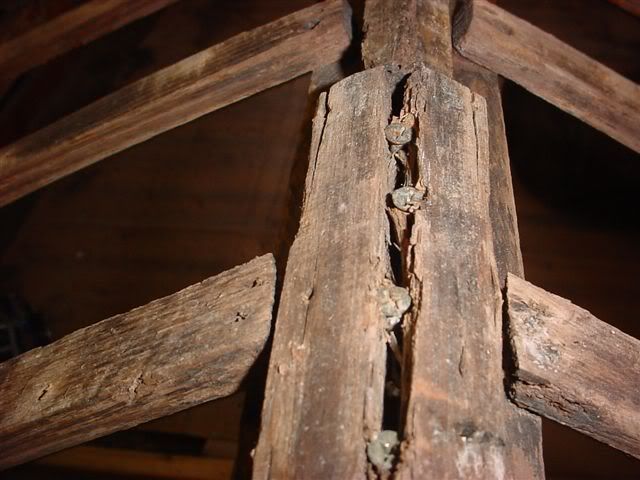
I'll probably have to scarf in a section to replace the bad part. The screws you see inside the crack are the screws that attach the stem end to the inner keel end.
I found the best way to remove the machine screws holding the lapstrakes together was to hold it with a screwdriver from the outside while my son was inside the boat with a socket in a cordless drill. He would spin off the nut and then push the screw out. Some of the screws broke, but it doesn't matter since I won't be reusing them.
As for the nails in the garboard at the stem and the keel, here is what I did. The keel nails are pretty short, so we used a short piece of 2x4 and a hand sledge from inside the boat to drive the plywood away from the keel. This pulled the nails with the plywood. We didn't have any nails break through the plywood and remain in the keel. However, the nails in the stem are much larger and we were required to remove them first. It was actually pretty easy to tap a medium-size flatblade screwdriver next to the nail and pry it up until we could grab the head and pull it out.
The next step before removing any more lapstrakes will be to build a structure to hold the lengthwise stringers that the floor is attached to. Since the ribs are screwed to these, it will keep the ribs in their proper place as the lapstrakes are removed. Eventually the keel will also have to be removed and the structure will be needed to retain the shape of the boat.
Steve
Here is the picture so far:
I had previously mentioned a few hidden nails through the boards that were covered up by the lap of the next lapstrake. They were probably used to hold the lapstrake in place while the screw holes were drilled. The nails are brass and are easily sliced flush with the rib. Here is how I sliced them off with a long chisel:
Finally, here's a major problem area: the end of the stem where it joins the inner keel. You can see from the picture below that it has split and pulled apart:
I'll probably have to scarf in a section to replace the bad part. The screws you see inside the crack are the screws that attach the stem end to the inner keel end.
I found the best way to remove the machine screws holding the lapstrakes together was to hold it with a screwdriver from the outside while my son was inside the boat with a socket in a cordless drill. He would spin off the nut and then push the screw out. Some of the screws broke, but it doesn't matter since I won't be reusing them.
As for the nails in the garboard at the stem and the keel, here is what I did. The keel nails are pretty short, so we used a short piece of 2x4 and a hand sledge from inside the boat to drive the plywood away from the keel. This pulled the nails with the plywood. We didn't have any nails break through the plywood and remain in the keel. However, the nails in the stem are much larger and we were required to remove them first. It was actually pretty easy to tap a medium-size flatblade screwdriver next to the nail and pry it up until we could grab the head and pull it out.
The next step before removing any more lapstrakes will be to build a structure to hold the lengthwise stringers that the floor is attached to. Since the ribs are screwed to these, it will keep the ribs in their proper place as the lapstrakes are removed. Eventually the keel will also have to be removed and the structure will be needed to retain the shape of the boat.
Steve
-
thegammas
- Posts: 566
- Joined: Sat Nov 25, 2006 2:10 pm
- Location: Wilmington, Delaware. peterstransky@verizon.net - put wooden boat in the subject
-
62cruiserinc
- Posts: 21
- Joined: Mon Apr 19, 2010 7:44 pm
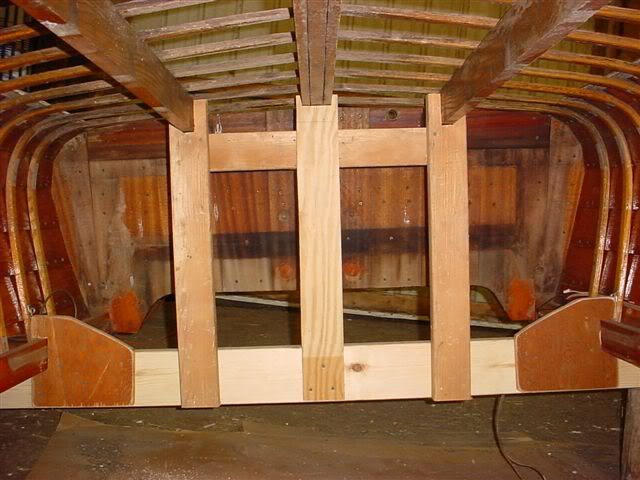
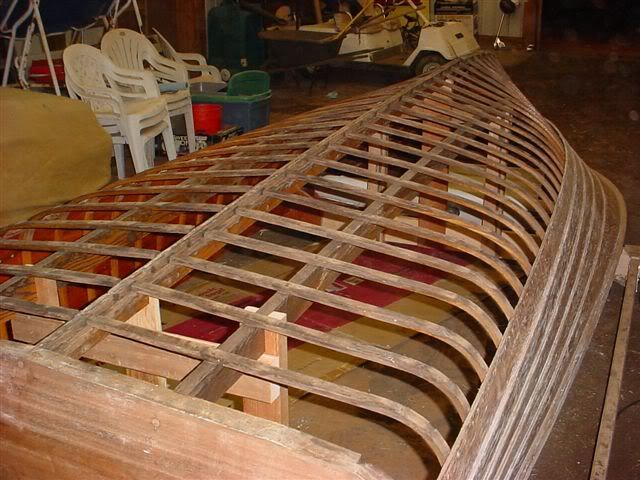
Last night we took off another two lapstrakes on each side. Before we removed those two, we made a support for each end of the lengthwise floor support (to keep the ribs in their proper place). here's a picture of the support:
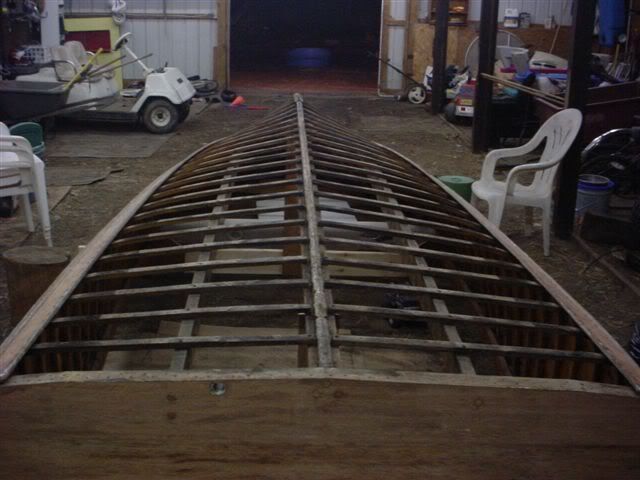
Here's a picture of the boat with the two garboards off and 4 lapstrakes on each side removed:
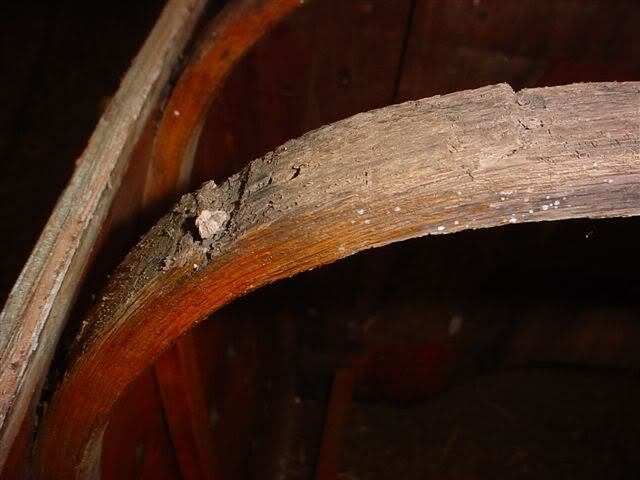
lastly, here's a picture of one of the ribs near the turn at the bilge. Most of the ribs have at least some black on them. Some even have a little rot on the bottom 1/16" or so. Then a few ribs have some cracking at the turn. How much damage is allowable (or repairable with epoxy, etc) before a rib must be replaced? Any suggestions?
Here's a picture of one rib:
Steve
Here's a picture of the boat with the two garboards off and 4 lapstrakes on each side removed:
lastly, here's a picture of one of the ribs near the turn at the bilge. Most of the ribs have at least some black on them. Some even have a little rot on the bottom 1/16" or so. Then a few ribs have some cracking at the turn. How much damage is allowable (or repairable with epoxy, etc) before a rib must be replaced? Any suggestions?
Here's a picture of one rib:
Steve
-
62cruiserinc
- Posts: 21
- Joined: Mon Apr 19, 2010 7:44 pm
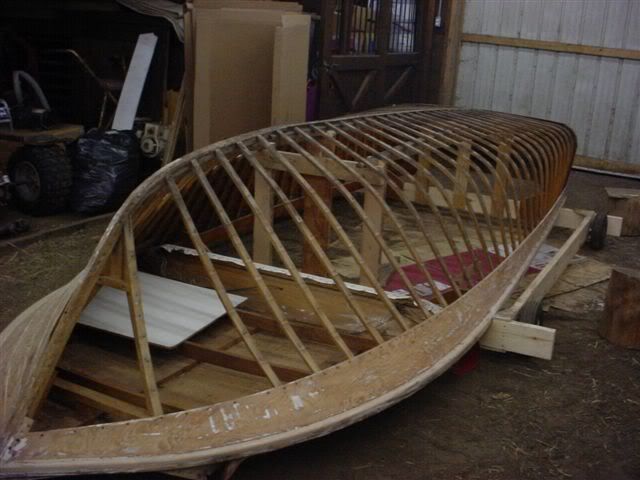
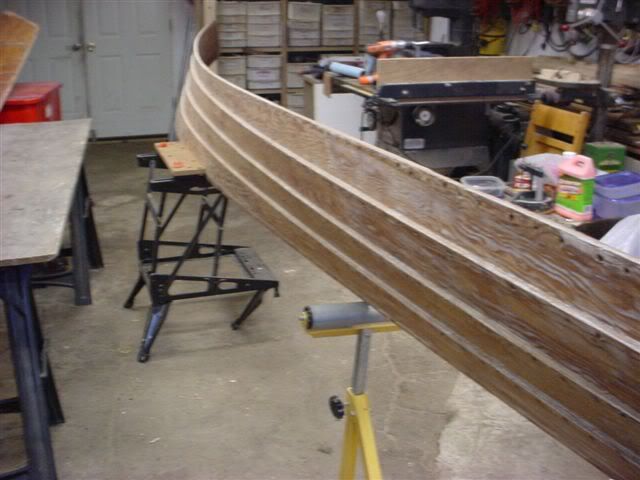
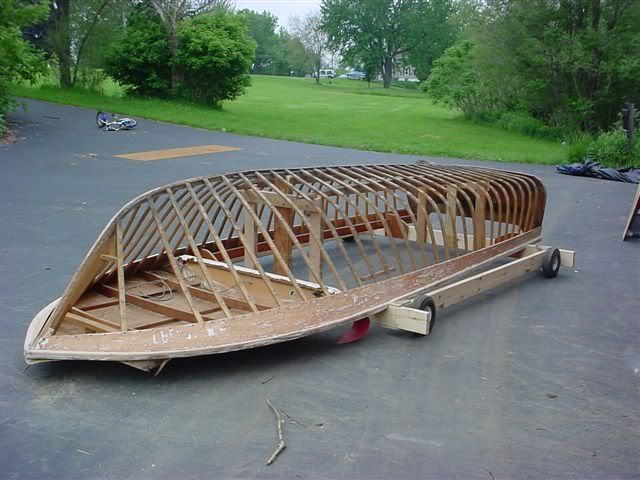
Yesterday we removed the rest of the boards on the right side of the boat. We are leaving the topmost lapstrake on. Here's a picture of the boat with one side off:
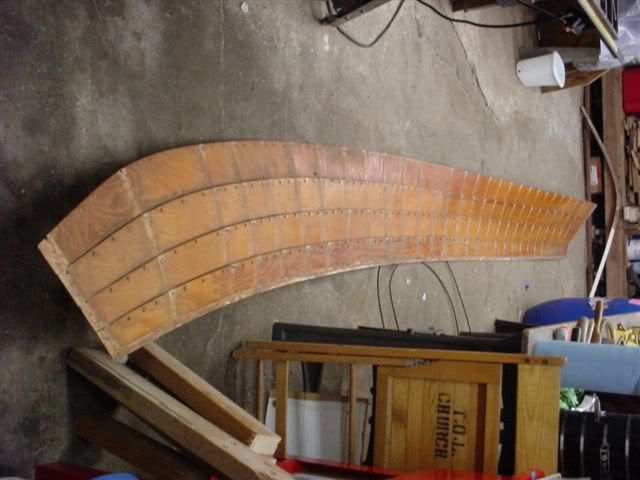
Something different for removal of the 4 boards: we removed the screws that go into the ribs, the nails into the stem, and the screws&nails into the transom. Then we removed the 4 lapstrakes as a complete unit for disassembly later in the shop. I had to use the long chisel to cut some nails into the ribs that were used by the factory, probably to stake down the lapstrakes temporarily while screw holes were drilled. Here's a picture of the 4 lapstrakes still attached to each other and off the boat:
Most of the ribs were only attached to the lapstrakes at the gunnell area. So when we removed the screws from the top lapstrake (at the first lap joint) that went into the ribs, the ribs were now loose at that end. After removing the lapstrakes, we re-installed the screws from the top lapstrake into the ribs to keep the ribs aligned. It also looks like the 5 rear ribs from the transom forward have some rot and cracking at the bend. I'll probably end up replacing them with new steam-bent ones.
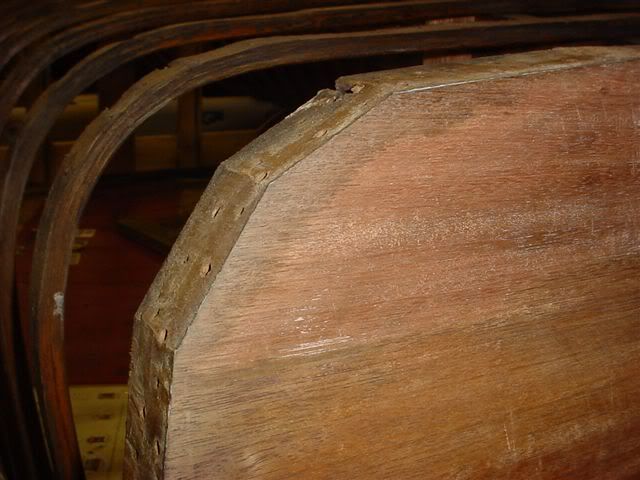
Finally, here's a closeup of the transom where the bilge curves, it shows how the transom is not round but has flat surfaces to match the lapstrakes:
Today we plan to remove the 4 boards together on the other side, which would end the lapstrake removal part of the project. Also the transom will probably be removed also, but I'll need to brace up the rear of the boat a little better to keep the shape.
Steve
Something different for removal of the 4 boards: we removed the screws that go into the ribs, the nails into the stem, and the screws&nails into the transom. Then we removed the 4 lapstrakes as a complete unit for disassembly later in the shop. I had to use the long chisel to cut some nails into the ribs that were used by the factory, probably to stake down the lapstrakes temporarily while screw holes were drilled. Here's a picture of the 4 lapstrakes still attached to each other and off the boat:
Most of the ribs were only attached to the lapstrakes at the gunnell area. So when we removed the screws from the top lapstrake (at the first lap joint) that went into the ribs, the ribs were now loose at that end. After removing the lapstrakes, we re-installed the screws from the top lapstrake into the ribs to keep the ribs aligned. It also looks like the 5 rear ribs from the transom forward have some rot and cracking at the bend. I'll probably end up replacing them with new steam-bent ones.
Finally, here's a closeup of the transom where the bilge curves, it shows how the transom is not round but has flat surfaces to match the lapstrakes:
Today we plan to remove the 4 boards together on the other side, which would end the lapstrake removal part of the project. Also the transom will probably be removed also, but I'll need to brace up the rear of the boat a little better to keep the shape.
Steve
I was able to use a very sharp ice pick under the nail head and pry them out.
Insead of a chisel, I used a thin hank saw blade to cut nails.
If you reuse transom,soak nail and screw holes with cpes.
I did not make patterns of each lapstrake, but might to good for the furture, if you have to replace one, or build a new boat from scratch. same with transom.
Looks like you are headed in the right direction. Great work!
Did you find any adhesive holding the lapstrake together or was it all gone?
Mine still had spots of adhesive beween the lapstrakes, althought 60/90 percent had failed. I used a hack sawblade, to remove the few spots of adhesive still holding.
You will find it is hard to loose shape of the hull and ribs, if you can reuse most of the wood, the hull will pullback in the same shape as before IF you can use most of the screw and nail holes.
I believe that the condition of you nail holes were very much like mine, since you were able to pop nails out by prying with a flat head screw driver. I'm gussing we both have/had light rot around were the nails wwere. In fact some of my nail heads had poped out above the plywood, before I started the reconscruction.
My nails were not ring shank.
I was able to reuse the oringial nail holes by soaking the hole with cpes and then using a slightly larger dia ring shank nail.
By reusing plywood lapstrakes and orginal nail and screw holes reassembly to the orginail hull shape was easy.
Be careful to someway mark the distance beween points on ribs before you remove the inner keel, and cut off the rib ends, otherwise you could find the hull has spread apart when refashening the garwood!
Some of my ribs had light surface rot, between lapstrakesand rib, I scraped them to clean wood and then soaked in cpes, and vanished. Shame Cruiser's did not have the available coatings and time to coat before assemly!
I did find a few cracks/splits running with the length of the rib. I did not find craks/splits a real concern. I scraped the crack and filled with expoxy. I did find one rib had been pieced together from the factory at one stringer. If I had found a crack across the rib I would have replaced.
I did find ribs at the stem rotted, as the rest of the ribs along the inner keel. The stem ribs were spliced/scarfed, the ribs alone the inner keel were cut short a little over an inch and a wider inner keel made up the difference.
You should find the transom, easy to disassemble, I took each piece thru my thinckest planner, just enought to remove old glue and flaten each board.
Disassembly of my boat would have not been possible if the glue and adhesive had not failed, I'm gussing your adhesive/glue is in the same shape as mine was.
Reassembly with todays glues and adhesives, will make dissasembly 50 years from now difficult, but maybe cpes and coatings behind the ribs will stretch the next 50 years before reconstruction to 100 years or more? Keeping the bilge dry with venilation will help also.
If I damage a lapstrake in an accident, the lapstrake will have to be removed by cutting or grinding, as I used 5200 between my lapstrakes, but no leaks period. If I had made a paper pattern of each lapstake, repairs woold be much easier
Your are doing great, keep up the good work.
-
62cruiserinc
- Posts: 21
- Joined: Mon Apr 19, 2010 7:44 pm
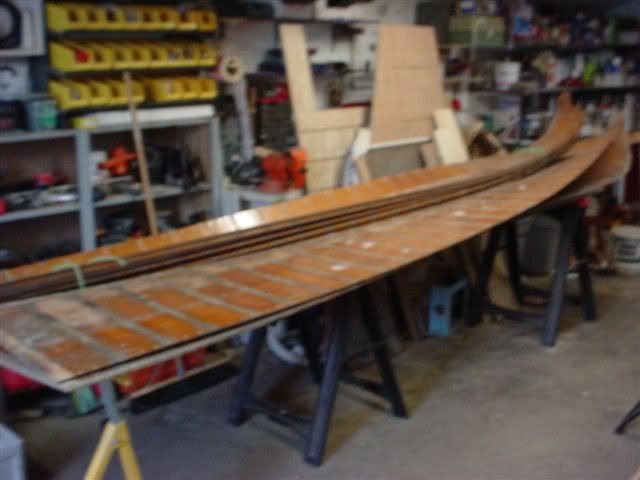
We removed the set of 4 lapstrakes on the other side also. Here's a picture of the unit in the shop awaiting disassembly:
It was a lot easier to unscrew the machine screws in the shop.
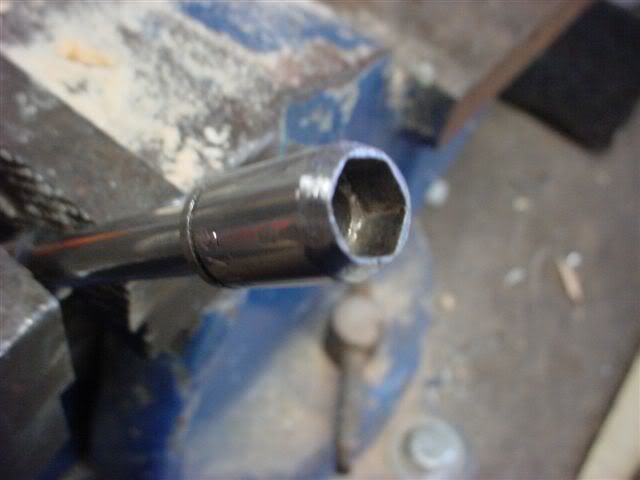
There were quite a few nuts which had partially or completely sunk into the wood, making removal more difficult. I modified a 5/16" socket to make it easy to remove all the nuts. Most socket have a radius on the bottom, which means that the bottom 1/16" or so doesn't contact the nut. I ground the bottom of the socket until the full hex appeared right at the bottom edge. Also, I tapered the outside edge of the bottom of the socket so it could be easily pushed onto the nut even if it was buried in the wood. after these socket mods, there was no longer any problems grabbing the nuts. Here's a picture of the modified socket:
The removed garboard and lapstrakes don't really leave a very big pile:
Finally, here's apicture of the boat outside with the garboards and all the lapstrakes (except the topmost) removed:
Now the next thing is to remove the transom. After that i will take inventory of what white oak (keel, stem,ribs) and mahogany (transom) I need to buy. Then I will have to wait while I order and receive the wood. After looking at the ribs, I think I am going to replace the rearmost 5 ribs on each side with new steam-bent ones becaus ethey are weakened at the bend.
Some of the plywood lapstrakes are a little beat at the transom end. I am not sure what I'll do with them yet. Maybe scarf in a piece at the end where they meet the transom.
Steve
It was a lot easier to unscrew the machine screws in the shop.
There were quite a few nuts which had partially or completely sunk into the wood, making removal more difficult. I modified a 5/16" socket to make it easy to remove all the nuts. Most socket have a radius on the bottom, which means that the bottom 1/16" or so doesn't contact the nut. I ground the bottom of the socket until the full hex appeared right at the bottom edge. Also, I tapered the outside edge of the bottom of the socket so it could be easily pushed onto the nut even if it was buried in the wood. after these socket mods, there was no longer any problems grabbing the nuts. Here's a picture of the modified socket:
The removed garboard and lapstrakes don't really leave a very big pile:
Finally, here's apicture of the boat outside with the garboards and all the lapstrakes (except the topmost) removed:
Now the next thing is to remove the transom. After that i will take inventory of what white oak (keel, stem,ribs) and mahogany (transom) I need to buy. Then I will have to wait while I order and receive the wood. After looking at the ribs, I think I am going to replace the rearmost 5 ribs on each side with new steam-bent ones becaus ethey are weakened at the bend.
Some of the plywood lapstrakes are a little beat at the transom end. I am not sure what I'll do with them yet. Maybe scarf in a piece at the end where they meet the transom.
Steve
-
62cruiserinc
- Posts: 21
- Joined: Mon Apr 19, 2010 7:44 pm
Yes, I am planning on making some sort of jig to hold the ribs in the proper shape after they are steamed until they dry.
I'm not sure what type of jig to use yet. Looks like each of the 5 ribs is slightly different from the other, so it will require 5 different jigs. The jig should probably hold 2 of the same at a time since I'm doing both sides.
The ribs are 1 1/8" wide, so I could use 2 pieces of 5/8" plywood glued together and cut to the right profile (using the old rib as a guide) and then clamp the ribs to the plywood.
Another way is to attach wooden angle brackets to a flat sheet of plywood and clamp the rib to the brackets. The wooden brackets could then be moved on the plywood to change the shape.
I'm going to borrow a friend's propane turkey fryer and fill it with water for the steam. An "upsidedown funnel" on top connected to a hose that attaches to a piece of pipe should do the trick.
Steve