16' Cruisers, Inc Seafarer Project

Questions/concerns/issues. How did the other guy do it? Find out here.

Moderators: a j r, TDockside, Miles, Moderators

txcaptdan
Posts: 348
Joined: Mon Jan 02, 2006 2:48 pm
Location: Weatherford, Texas
Contact:

Post by txcaptdan »

Jim,
I usually get away with 2 coats and end up with 3 before I am done. If you own this boat for any length of time you probably will do another couple of coats over the years to freshen up anyway.
But three is plenty.

KCD,
Braces were made from 2x4s see photo. Mine was attached with screws into deck, my deck will be covered with canvas. If you have a varnished deck then try and use windshield mounting screw holes or be prepared to fill holes when done.
Image

Image

Good luck
Dan
Image
Dan Stober
1965 20' Cruisers Inc. 570 Seacamper
1962 20' Cruisers Inc. 502
1963 16' Cruisers Inc. 202 Seafarer
Weatherford, Texas
jim hays
Posts: 91
Joined: Tue Dec 27, 2005 5:09 pm
Location: Columbia City Oregon

antifoul paint on your project

Post by jim hays »

Dan: Am I correct in stating that you used the area that you painted this on the bottom (antifoul paint) so you can finish it off when you finally put the boat in water and find the water line without having to lay on your back whle putting it on. Thanks Jim Hays
txcaptdan
Posts: 348
Joined: Mon Jan 02, 2006 2:48 pm
Location: Weatherford, Texas
Contact:

Post by txcaptdan »

Jim,
Yes I painted the bottom with a copper bronze, but was not sure exactly where the true water line was so I ran one that is probably lower than where it will be. It is easier to add bottom paint to sides to correct water line than to lower line.
And yes I did not want to lay on my back to do this, getting smarter in my old age.

I spent the day mounting engine, adding stainless, steering cables and installing steering wheel. She is really starting to look like a finished boat!!!!
Will post some more photos soon.
Dan
Image
Dan Stober
1965 20' Cruisers Inc. 570 Seacamper
1962 20' Cruisers Inc. 502
1963 16' Cruisers Inc. 202 Seafarer
Weatherford, Texas
vinny
Posts: 8
Joined: Sun May 20, 2007 1:28 pm

Post by vinny »

Txcapt, if you want I will go measure my water line, its a seafarer.
txcaptdan
Posts: 348
Joined: Mon Jan 02, 2006 2:48 pm
Location: Weatherford, Texas
Contact:

Post by txcaptdan »

Catching up on posts...it has been a while and a lot of work has been done!
I finished staining inside of transom and added 4 coats of varnish.
I attached corner blocks that ski tows go through then bolted in oak cross bar, even had original bronze bolts that only took a little work with my dremel tool to make look like new.

Image

Image

After installing bolts I sanded the transom again and added two more coats of varnish, seals around bolt heads and seals bolt surfaces themselves.

Image

Image

Image

I reinstalled steering and controls, the cables I had were filthy but a little soap and water and they look like new. I reattached pulley mounts and cable guides and with a little eyeballing everything went back together. The steering wheel came next along with guages.

Image

Image

Image

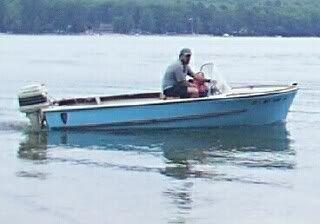
Mounting the engine went smoothly, I attached all mounting plates and hung engine with a come along then gently lowered her into place. This is the original 25HP that came with boat, i am going to see if I can make her run don't know that this will be final engine. but hey this is what most of us learned to ski behind.

Image

Image

I have been working on stainless trim, I buffed it out with steel wool then worked it over with my dremel tool and buffing tool. Most of these pieces were in pretty bad shape but cleaned up well. Does anyone seal this stuff with anything to keep shine?

Image

Image

She is really starting to look like a boat again. I took her to our wood boat show last weekend as a project under construction. Got a lot of raves!

Image

Image

Am getting ready to work on floors and decks, to be covered with marine vinyl like original. Windshield is in excelant shape and just needs a fresh coat of varnish.
More to come.
Image
Dan Stober
1965 20' Cruisers Inc. 570 Seacamper
1962 20' Cruisers Inc. 502
1963 16' Cruisers Inc. 202 Seafarer
Weatherford, Texas
thegammas
Posts: 566
Joined: Sat Nov 25, 2006 2:10 pm
Location: Wilmington, Delaware. peterstransky@verizon.net - put wooden boat in the subject

Post by thegammas »

looks fabulous Cap!!!!! Thanks for the inspiration!
Peter Stransky
1962 Cortland Custom Sea Lancer
Wilmington, Delaware
Richp
Posts: 13
Joined: Wed May 30, 2007 5:24 am
Location: Sterling, MI
Contact:

Post by Richp »

Absolutely a beautiful Boat!

Rich
1960? Royal-Craft Royal-Deluxe
Sterling, MI
Image
jim hays
Posts: 91
Joined: Tue Dec 27, 2005 5:09 pm
Location: Columbia City Oregon

bleaching ribs

Post by jim hays »

Dan what is the product used to bleach the wood some of my ribs have black spots on them and when they are varnished they will show just a black spot. I know that you don use clorox but what and how long as a rule do you leave it set on the wood and will this help with the greying of the laps? Thanks Jim Hays
John Hart
Posts: 208
Joined: Sun Jan 29, 2006 7:26 pm

Post by John Hart »

Jim.. I used two things on the deck and seats of my Seacoaster which had gray areas... a wood wash, which helped a little, but the most help was wood bleach... oxalic acid... it is in a small 1-2 pint tub at the hardware store for about $6...

I mixed the powder in a small pot pie tin or butter container... sometimes so think it was not even all dissolved in water. I put it on with a small brush, or even a Qtip on small 1/4" areas... sometimes I left it on 1/2-1 hour, sometimes a lot less...

You can experiment.. on several of my areas I did it multiple times... then rinse with clear water and lightly sand.

Unfortunately, I did the inside of my boat, before I knew about this, and missed the opportunity to get the dark spots out of the inside of the transom, and ribs...
John Hart
Posts: 208
Joined: Sun Jan 29, 2006 7:26 pm

Post by John Hart »

I forgot to mention that I tried NOT to get it on areas that were not black... I didn't want to bleach anything that didn't need it. THat is why I mostly did it with a Qtip.

In the end, some dark areas were so restored that they were indistinguishable from the originally non-dark areas.
txcaptdan
Posts: 348
Joined: Mon Jan 02, 2006 2:48 pm
Location: Weatherford, Texas
Contact:

Post by txcaptdan »

After mounting engine I ran a compression test and both cyclinders came up at around 110. I installed two new plugs and washed out carb with B-12 chemtool. I drained lower unit and it had a little water in it but mainly oilso I refilled with new oil then hooked up harness and added a battery. I replaced fuel lines to and from fuel pump as they had hardened to a brittle state.
This engine had not been run since 1990 and I did not know what to expect. I put a rubber trash can under lower unit and filled with water until pick up was covered.
Added a fuel tank and line then pumped the bulb and sprayed a little starting spray into the carb and turned the key, she took several tries but then cranked right up and fell into a quick idle, WOW!!!! She shifted into both forward and reverse.
What a pleasant suprise. I am still working on canvas decks so it may be later this summer before she is actually launched.
Plus-it won't stop raining here-very unusual for this area and time of year.
Image
Dan Stober
1965 20' Cruisers Inc. 570 Seacamper
1962 20' Cruisers Inc. 502
1963 16' Cruisers Inc. 202 Seafarer
Weatherford, Texas
thegammas
Posts: 566
Joined: Sat Nov 25, 2006 2:10 pm
Location: Wilmington, Delaware. peterstransky@verizon.net - put wooden boat in the subject

Post by thegammas »

I'm hoping for the same results on my Mercury when I finally get to that point. Was hoping to have her wet a montly ago, now it looks like end of this month, as long as there are no suprises under the floors.
Peter Stransky
1962 Cortland Custom Sea Lancer
Wilmington, Delaware
txcaptdan
Posts: 348
Joined: Mon Jan 02, 2006 2:48 pm
Location: Weatherford, Texas
Contact:

Post by txcaptdan »

Finally getting back to working on her some more. Prepped decks by filling all dents and holes with a marine filler. Will sand smooth and clean up for canvas installation.
I made a photoshop comp of what she will look like. I have deceided to do a cream with Johnson red.

This is only a test......

Will have real shots soon.[img][img]http://img401.imageshack.us/img401/1372/tdboatcolorsredkh2.jpg[/img]
Shot at 2007-07-17[/img]
Image
Dan Stober
1965 20' Cruisers Inc. 570 Seacamper
1962 20' Cruisers Inc. 502
1963 16' Cruisers Inc. 202 Seafarer
Weatherford, Texas
thegammas
Posts: 566
Joined: Sat Nov 25, 2006 2:10 pm
Location: Wilmington, Delaware. peterstransky@verizon.net - put wooden boat in the subject

Post by thegammas »

Looks great! The color combination is great. Can I ask what brand/type of marine filler you have been using? And is it suitable for both under and above the water line?

She really is looking great.

Pete
Peter Stransky
1962 Cortland Custom Sea Lancer
Wilmington, Delaware
txcaptdan
Posts: 348
Joined: Mon Jan 02, 2006 2:48 pm
Location: Weatherford, Texas
Contact:

Post by txcaptdan »

I have been using Formula 27 and have used it both above and below water line. West Marine sells it under its own name as marine filler, it mixes and works just like auto body filler.
Hope to start covering decks this weekend.
Image
Dan Stober
1965 20' Cruisers Inc. 570 Seacamper
1962 20' Cruisers Inc. 502
1963 16' Cruisers Inc. 202 Seafarer
Weatherford, Texas
Post Reply